Diberdayakan oleh Blogger.

Easy Rowing Boat Plans for First-Time DIY Enthusiasts

Easy Rowing Boat Plans for First-Time DIY Enthusiasts

So, you've got the itch to build something with your own two hands, and a peaceful glide across the water sounds pretty idyllic, right? Building your own rowing boat might seem daunting, but trust me, it's way more achievable than you think, especially if you choose the right plans. This guide is for folks just starting out – no prior boat-building experience necessary! We'll break down everything into easy-to-follow steps, focusing on simplicity and practicality.

Choosing Your Boat Design: Keeping it Simple

The key to a successful first-time build is choosing a simple design. Forget about elaborate, curvy hulls – we're going for straightforward, easy-to-construct options. A few good choices for beginners include:

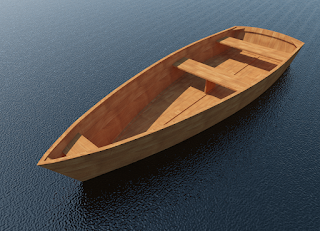
  • Simple flat-bottomed rowboat: These are incredibly stable, making them perfect for learning to row and for calm waters. They're also the easiest to build.
  • Small punt: Similar to a flat-bottomed rowboat but often slightly wider and flatter, offering even more stability. Think of a mini-raft with a more defined shape.
  • Small canoes (simple designs): Some canoe designs are surprisingly straightforward to build, especially those utilizing simple plywood construction techniques. Look for plans specifically marketed towards beginners.

Avoid designs with complex curves or intricate joinery until you've got some experience under your belt. There are plenty of free and low-cost plans available online – just search for "simple plywood rowboat plans" or "beginner canoe plans". Remember to carefully review the plans before you start to ensure you understand every step.

Gathering Your Materials: What You'll Need

The materials list will vary slightly depending on your chosen boat design, but generally, you'll need:

Wood:

  • Plywood: Marine-grade plywood is best as it's resistant to rot and water damage. The thickness will depend on your boat's size and design (typically between ½" and ¾").
  • Wood strips (optional): Some designs use wood strips for added strength and aesthetic appeal. Cedar or mahogany are popular choices.
  • Wooden battens (optional): These are thin strips of wood used for reinforcing seams and adding structural support.

Fasteners & Adhesives:

  • Marine-grade epoxy resin and hardener: This is essential for strong, waterproof joints.
  • Screws: Use stainless steel screws to prevent rust. Choose the appropriate size and length for your plywood thickness.
  • Wood glue: A good quality exterior wood glue will provide additional bonding strength.

Other Essentials:

  • Measuring tapes and squares: Accuracy is crucial in boat building!
  • Jigsaw or circular saw: For cutting the plywood to size. A jigsaw is often preferred for curved cuts.
  • Drill with various drill bits: For pilot holes and screw insertion.
  • Clamps: Many clamps of varying sizes will be necessary to hold pieces together while the glue and epoxy cure.
  • Sandpaper: For smoothing surfaces and edges.
  • Paint or varnish: To protect your boat from the elements. Marine-grade paint is highly recommended.
  • Oars or paddles: You'll need something to propel your beautiful creation!

Step-by-Step Construction: A General Guide

The specific steps will depend on your chosen plans, but here's a general outline of the process:

  1. Prepare the plywood: Cut the plywood pieces according to your plans. Make sure your cuts are accurate and clean.
  2. Assemble the hull: This is where the plans become crucial. Follow the instructions carefully, using epoxy and screws to join the pieces together. Clamps are your best friend here – use plenty!
  3. Reinforce the joints: Once the epoxy has cured, you might need to add additional reinforcement, such as wood battens or strips, to critical areas.
  4. Sand and finish: Once the hull is assembled, sand down any rough edges and imperfections. Apply several coats of marine-grade paint or varnish for protection.
  5. Add any final details: This could include things like seats, oarlocks, and any other features specified in your plans.

Remember to take your time and be meticulous. Accuracy is essential for a sturdy and seaworthy boat. Don't rush the process – a well-built boat will last for years!

Safety First!

Working with power tools requires caution. Always wear safety glasses and appropriate hearing protection. Make sure your workspace is well-lit and organized. If you're unsure about any step, consult the plans or seek advice from someone experienced in woodworking or boat building.

Testing Your Boat: The Grand Finale!

Once your boat is finished, it's time for the exciting part: the maiden voyage! Start in calm waters and gradually test your boat's stability and handling. Take a friend or family member along for safety. Enjoy the fruits of your labor and the serene feeling of gliding across the water in your handmade rowing boat!

Commonly Asked Questions

Q: What's the best type of wood to use?

A: Marine-grade plywood is the best choice for its water resistance. For added strength and aesthetics, you can use cedar or mahogany strips.

Q: How long will it take to build a simple rowboat?

A: This depends on the complexity of the design and your experience level. A simple design could take a few weekends, while more complex designs might take several weeks.

Q: Do I need any special tools?

A: A jigsaw, drill, clamps, and measuring tools are essential. A circular saw can also be helpful.

Q: Where can I find plans?

A: Many free and paid plans are available online. Search for "simple plywood rowboat plans" or "beginner canoe plans". Check out sites like Duckworks and other boat-building forums.

Q: What if I make a mistake?

A: Don't worry! Everyone makes mistakes. With wood, you can often correct minor errors with careful sanding and repair. For larger mistakes, you might need to start over on that particular section. Learn from your mistakes and keep going!

Building your own rowing boat is a rewarding experience. It's a chance to learn new skills, create something beautiful and functional, and enjoy the peacefulness of being on the water. So grab those plans, gather your materials, and get started! Happy building!

Plywood Boat Kits with Matching Step-by-Step Plans

Plywood Boat Kits with Matching Step-by-Step Plans: A Comprehensive Guide

The allure of crafting a vessel with one's own hands is a timeless pursuit. For those seeking a manageable yet rewarding project, plywood boat kits paired with detailed step-by-step plans offer an accessible entry point into boatbuilding. This comprehensive guide explores the nuances of selecting and utilizing such kits, emphasizing the critical role of accurate and comprehensive instructions.

Choosing the Right Plywood Boat Kit

The success of any boatbuilding project hinges on the careful selection of the appropriate kit. A multitude of factors must be considered before committing to a particular design.

Boat Size and Type:

The size and type of boat dictate the complexity of construction, the required skillset, and the ultimate utility of the finished product. Smaller kayaks or canoes present a relatively straightforward challenge, suitable for beginners. Larger designs, such as small sailboats or motorboats, demand greater experience and woodworking proficiency. Consider the intended use: leisurely paddling, fishing expeditions, or more demanding recreational activities.

Plywood Quality and Grade:

The quality of the plywood is paramount. Marine-grade plywood is essential for its resistance to rot, moisture absorption, and degradation caused by prolonged exposure to water. Look for plywood graded according to its strength and durability. Higher grades generally signify fewer imperfections and greater structural integrity, although they come at a higher price point. The thickness of the plywood will also influence the boat's strength and weight.

Kit Completeness and Included Components:

A comprehensive kit should ideally include all necessary plywood sheets pre-cut to the required dimensions, along with essential hardware such as fasteners, fittings, and any specialized components. Thoroughly review the kit's contents list to ascertain its completeness. Incomplete kits might require sourcing additional materials, potentially adding cost and complexity.

Reputation of the Kit Supplier:

Prior to purchasing, research the reputation of the kit supplier. Examine online reviews and testimonials from previous customers to gauge the quality of the kits, the accuracy of the plans, and the level of customer support provided. A reputable supplier will offer readily accessible contact information and responsive customer service.

Understanding and Utilizing Step-by-Step Plans

The accompanying step-by-step plans are the cornerstone of a successful build. Detailed, accurate plans are crucial for ensuring the structural integrity and functionality of the finished boat.

Plan Clarity and Detail:

The plans should be clear, concise, and easy to understand. Detailed diagrams, illustrations, and written instructions should be provided for each stage of construction. Ambiguous or poorly rendered plans can lead to costly mistakes and potentially compromise the safety of the finished boat.

Materials List and Specifications:

The plans must contain a comprehensive materials list specifying the type, quantity, and dimensions of all required materials. Accurate specifications are vital to ensure that the components fit together correctly and the final product meets the design criteria. Any deviations from the specified materials could compromise the structural integrity of the boat.

Sequential Instructions and Diagrams:

The instructions should be presented in a logical, sequential order, guiding the builder through each step of the process. Clear and well-labelled diagrams should accompany the written instructions, offering visual aids that complement the textual descriptions. This ensures that the builder understands the spatial relationships between components and can accurately assemble them.

Troubleshooting and FAQs:

Reputable suppliers often provide troubleshooting guides or frequently asked questions (FAQs) to address common issues encountered during the construction process. This invaluable resource can help prevent mistakes and streamline the building process. Accessing this information proactively can save valuable time and reduce frustration.

Building the Plywood Boat: A Step-by-Step Overview

While specific steps vary based on the chosen kit and design, a generalized overview of the construction process typically follows these phases:

Preparation and Layout:

Before commencing construction, meticulously review the plans and gather all necessary tools and materials. Carefully lay out the plywood sheets according to the provided plans, ensuring accurate placement of all components. Precise measurement and marking are crucial at this initial stage to prevent errors later in the process.

Cutting and Shaping:

Utilize appropriate cutting tools, such as jigsaws or circular saws, to cut the plywood sheets to the designated dimensions. Pay close attention to the accuracy of the cuts, as any deviations will impact the fit and structural integrity of the boat. Employ clamps and other support mechanisms to prevent warping or damage during the cutting process.

Assembly and Fastening:

Follow the plans meticulously when assembling the various components. Use appropriate fasteners, such as screws or rivets, to securely join the pieces. Ensure that the fasteners are correctly positioned and adequately tightened to guarantee a strong and stable structure. Pay attention to the recommended spacing and alignment specified in the plans.

Finishing and Sealing:

Once the boat's structure is complete, apply a suitable sealant to protect the plywood from moisture damage. A marine-grade varnish or epoxy resin is recommended for optimal protection against water absorption and degradation. Apply the sealant in multiple thin coats, allowing each coat to dry completely before applying the next.

Testing and Launching:

Before launching the boat, conduct a thorough inspection to ensure that all components are securely fastened and the sealant is properly applied. Conduct a test run in a controlled environment, such as a calm body of water, to assess the boat's stability and handling characteristics. Always wear appropriate safety gear when operating the boat.

Conclusion

Constructing a plywood boat from a kit with detailed step-by-step plans can be a rewarding and fulfilling experience. By carefully selecting a suitable kit, thoroughly understanding the provided instructions, and meticulously following the building process, you can create a durable and functional watercraft. Remember that patience, precision, and attention to detail are key to achieving a successful outcome. Always prioritize safety and adhere to all relevant boating regulations.